

EXHAUST END CAPS
These instructions cover all the end caps we sell. If you have one for a 390 adventure or a TPI bike, please scroll to the bottom of the page. All other bikes are here at the top

If you got a cap for the 2011-21 moto bikes, and not the TPI or 390 adv, then you don't need to drill out any rivets.
Your cap may come assembled but for packing reasons, it probably won't . So when you get it, it will most likely look like the pic above.

All you need to do is take it apart, turn the spark arrestor screen around, make sure it's in, or close to the center, and tighen down the 2 allen screws. Now it's ready to go in the muffler.
The 2019 - 21 mufflers, are pretty east to get the stock end cap out of. Just remove the old cap and don't worry about the big O ring that may break off of the stock end cap. You don't need to re use it. Install new cap and re use the stock securing bolts.

If you have a 2017-19 EXCF or FE-S muffler, it may be a bit harder to get the end cap out of it. Especially on the Husqvarna's. You may need to bang it out, as shown below.
The bolts that hold the stock end cap on are easier to get off if you remove the muffler first. Especially on the Husky. They are a torx bolt head, size T25.
You will probably notice that the holes in the muffler can are ovaled out and don’t line up too well with the muffler cap. The Huskys are worse than the KTM’s it seems. They aren’t all this way but it seems these mufflers were just assembled by really mad teenagers that cared about nothing.

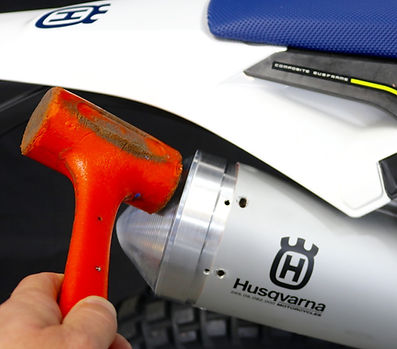
After the bolts are out, you can beat the end cap off easier if you put the muffler back on the bike. Yes, I am using a chisel and a big hammer to bang it off.
The KTM’s come off pretty easy, but the Husky’s will probably need some good smacks. Some really good smacks so don’t be a sissy here. If the bolts are out there is nothing holding it in except friction and the fact that the mad teenager who put it together smashed part of the cap into the core and it’s stuck.
It will come out though. You’ll need to beat it on the top and bottom side if you have a Husky FE. The FX and FC models come out pretty easy.


When the end cap comes off, there is some packing material that sticks out of the end. You will want to remove it by cutting it off. It cuts off pretty easy with a sharp razor blade. Cut so that it’s about flush with the end of the muffler can.
You can see that the bottom of the core on the FE muffler is all banged up. Seems like a lot of them are that way from bad assembly practices. You may have to grab the pliers and straighten it out or make it round again before you install the new end cap.

Tap the new end cap in. It goes in a lot easier than the old one came out. You can see here how far off the can’s screw holes are.
They are all ovaled out from the stock cap. Ours lines up better with most cans, but if you have to open up the holes a bit then that’s what you have to do. Installing one screw usually pulls it more in line.

Now for TPI and 390 ADV end caps. The only difference is you need to drill out
the stock rivets


Use a step drill bit or a 1/4" ( 7mm ) bit, to easliy pop the heads off of the rivets. Then just knock them into the muffler with a punch or small phillips screwdriver or even a 3/16" ( 5mm ) drill bit.
Then you should be able to knock the stock end cap out.
You may need to trim some of the stock muffler packing out, to get the new cap in there.